Get in Touch with Didi Land


Updated June 2026 · Reviewed by the Guangzhou Didi Land Amusement Equipment Co., Ltd. design & engineering team.
An indoor playground design layout is the floor plan that divides a commercial play space into functional zones — entry, toddler, active play, quiet/sensory, party, and supervision/café — sized so 60–70% of the floor stays usable for play. The right floor plan balances capacity, sightlines, safety clearances, and revenue flow for your venue type and square footage. This guide give you 12 floor plan templates for FEC, mall, and daycare builds, plus the sizing, zoning, and circulation rules behind them. Across our 600+ indoor playground installations in 40+ countries, the layout decided before any equipment ships is the one that decides whether a space earns or stalls.
Quick Specs: Indoor Playground Layout Planning
| Usable play area (of gross footprint) | 60–70% |
| Floor area per child — low-impact play | 25–35 sq ft |
| Floor area per child — dynamic play | 40–50 sq ft |
| Toddler (0–3) zone share of play area | 15–25% |
| Accessible route width (ADA) | 60 in default; 36 in pinch |
| Equipment use-zone clearance (ASTM F1487-25) | 6 ft, or 9 ft if >30 in high |
| Ceiling clearance for multi-level | 12–16 ft |
The Anatomy of an Indoor Playground Floor Plan: The 6-Zone Backbone

Before you order even one rope or frame, an indoor playground floor plan organizes the space into six functional zones. This structure, the 6-Zone Floor Plan Backbone, is the order any good layout gets drawn in: entry/check-in, toddler, active play, quiet/sensory, party rooms, and supervision/café, and each zone has its own footprint share, adjacency rule, and job. Apply the Backbone before you select equipment and the rest fall into place; do it out of order and you pay to move walls.
You design zones first and add equipment later because supervision and flow depend on it. Active play is where most of the physical activity concentrates, so that zone need the clearest sightlines of all. Because the U.S. Consumer Product Safety Commission’s Public Playground Safety Handbook stresses that supervising adults must be able to see every play area, the supervision/café zone has to look into the toddler and active zones, not away from them. In practice, six-zone plans leave roughly 60–70% of the gross floor as usable play space, with the rest going to reception, restrooms, party rooms, and circulation. As a working split, the toddler zone runs 15–25% of the play area, the main structure 35–45%, the supervision/café 10–15%, and the quiet/sensory retreat 5–10% — ratios that hold from a 400 sq ft daycare room up to a 12,000 sq ft anchor.
| Zone | Share of play area | Adjacency rule | Sightline need |
|---|---|---|---|
| Entry / check-in | 5–8% | First touch; controls access & socks/shoes | Sees the exit and the floor |
| Toddler (0–3) | 15–25% | Enclosed; away from high-energy traffic | Fully visible from seating |
| Active play (main structure) | 35–45% | Core anchor; multi-level allowed | Open lines into every level |
| Quiet / sensory | 5–10% | Buffered from noise; calm retreat | Visible but acoustically separated |
| Party rooms | 10–20% | Own entrance; near café, not through play | Window onto the play floor |
| Supervision / café | 10–15% | Central; parents seated, watching | Panoramic view of all zones |
💡 Pro Tip
When designing a floor plan, always place the supervision/café zone first!
If a parent relaxing in this area cannot view the toddler and the top level of the facility play structure, then the layout will fight against you every step of the way.
12 Indoor Playground Floor Plan Templates by Venue and Footprint

The most effective starting place for planning your kids indoor playground’s floor layout is by adapting a known working plan archetype.
Our 12-Template Indoor Playground Floor Plan Library gives venue-by-footprint starting points, distilled from Didi Land projects across family entertainment centers (FEC), shopping malls, and daycare and childcare builds. Below are suggested capacities, circulation schemes, floor sizes and the application venue to each template-all based on our proprietary space-planning principles. The capacity numbers are only recommendations; always verify against your local occupant load limit before ordering.
| # | Venue & footprint | Zones included | Capacity* | Circulation | Best for |
|---|---|---|---|---|---|
| 1 | FEC — 1,500 sq ft | Entry, toddler, active, café | ~30–40 | Single loop | Starter / test market |
| 2 | FEC — 3,000 sq ft | + quiet/sensory, 1 party room | ~55–65 | Loop + party spur | Neighborhood FEC |
| 3 | FEC — 6,000 sq ft | Full 6 zones, 2–3 party rooms | ~110–140 | Central hub-and-spoke | Destination FEC |
| 4 | FEC — 12,000+ sq ft | 6 zones + attraction wing | ~220–300 | Multi-loop + spine | Anchor / mixed attraction |
| 5 | Mall — kiosk ~500 sq ft | Toddler-only soft play | ~12–18 | Open perimeter | Pay-per-use, high visibility |
| 6 | Mall — inline ~1,500 sq ft | Entry, active, café ledge | ~30–40 | Front-load, deep play | Inline storefront unit |
| 7 | Mall — anchor ~4,000 sq ft | Full zones, vertical play | ~75–95 | Hub-and-spoke | Foot-traffic anchor |
| 8 | Daycare — room ~400 sq ft | Toddler soft play, tunnel | ~10–14 | Single room, one exit path | In-classroom play |
| 9 | Daycare — adjacent ~800 sq ft | Toddler + preschool split | ~20–26 | Two-zone spine | Classroom-adjacent gross-motor |
| 10 | Daycare — dedicated ~1,500 sq ft | Age-banded, sensory corner | ~30–40 | Age-segregated loop | Preschool / early-learning |
| 11 | Play-café ~1,000 sq ft | Café-centric, toddler-led | ~22–30 | Café ring around play | Parent dwell + F&B |
| 12 | Hotel / resort ~2,000 sq ft | Themed active + quiet | ~40–55 | Loop + viewing lounge | Amenity / kids’ club |
Picking a template is faster than it looks. On a recent project, a first-time operator walked in with a 1,500 sq ft inline mall storefront and a plan to cram in a 6,000 sq ft FEC’s worth of structures. We started from Template 6 instead: entry up front, a single deep-play loop, and a café ledge on the sightline. The footprint held about 35 children comfortably, the parents could see every level from one bench, and the build came in months ahead of the over-scoped version the operator first sketched. The template did not limit the venue — it kept the venue from fighting its own square footage.
*Recommended maximum simultaneous children assuming the application of an appropriate local occupant-load factor as explained under Sizing and Scaling rules.
How Much Space Do You Need? Sizing a Layout by Square Footage and Capacity
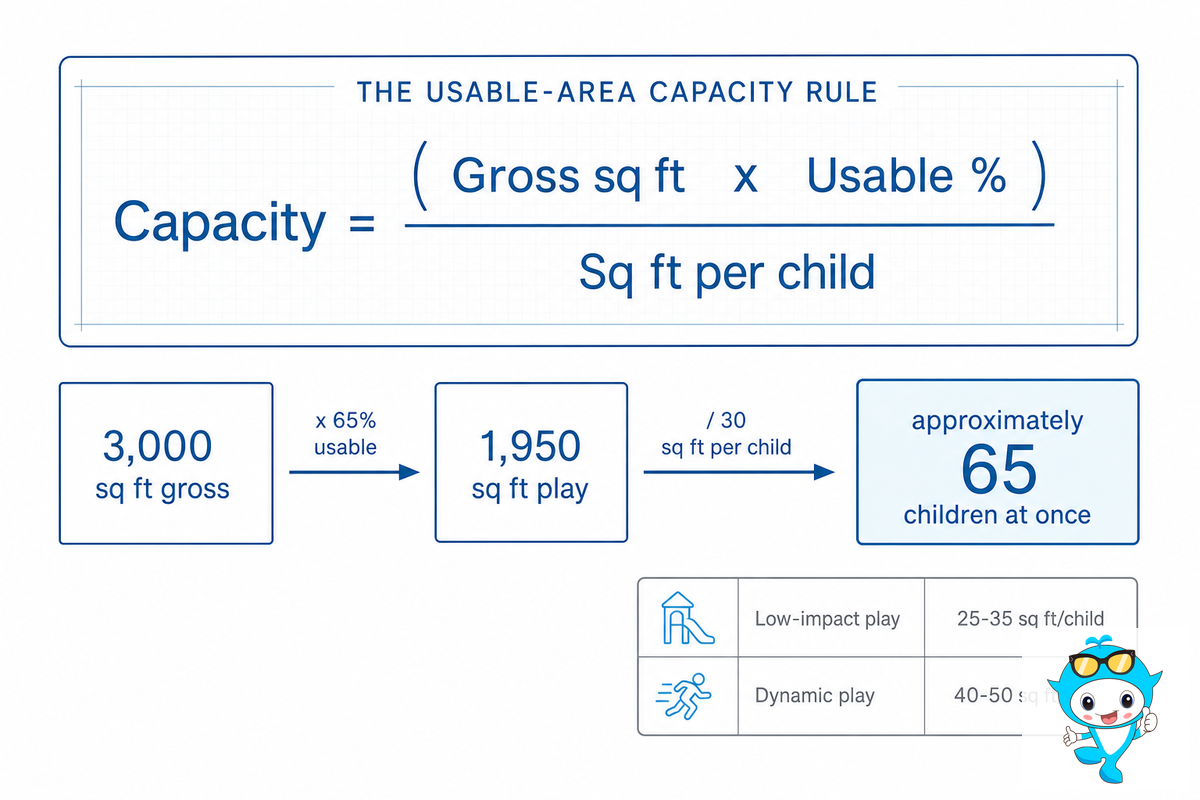
You size an indoor playground for capacity with one formula, the Usable-Area Capacity Rule: usable area divided by square feet per child. Plan 25–35 sq ft per child for low-impact play and 40–50 sq ft for dynamic zones, applied to the usable 60–70% of your gross floor. That converts a raw footprint into a real number of simultaneous children, and it is the single most useful calculation in the whole plan:
📐 Engineering Note — Usable-Area Capacity Rule
Capacity = (gross sq ft × usable %) ÷ sq ft per child. Worked example: a 3,000 sq ft unit at 65% usable gives 1,950 sq ft of play space. At ~30 sq ft per child (a blended low-impact/dynamic figure) that works out to roughly 65 children at once. Push usable down to 55% or sq ft per child up to 40, and the same shell holds only ~40, the layout, not the lease, sets the ceiling.
And that square footage per child isn’t a single point value. Industry space-planning standards allocate around 25-35 sq ft per child for low-impact zones (such as soft play and ball pits), and 40-50 sq ft per child for dynamic zones (such as climbing walls, obstacle courses, and slides) (industry benchmark data – treat as directional and double-check with your designer). Then double-check with your occupant load, which the building code (IBC) establishes by occupancy classification – so the limiting factor is dependent on how your zone is classified. As an example, in a 3,000 sq ft zone with a daycare factor of 1/35 sq ft (one person per 35 sq ft), the occupant load is approximately 86, but the number of exits can limit egress density to less than 20 sq ft per person. Always verify your classification and required exit count with a local building department, because the latter can limit capacity before the former.
⚠️ Important — bigger is not automatically more capacity
A common assumption is that a larger footprint or more equipment serves more children. It does not. Once circulation paths narrow below the usable minimum, staff have to hand-regulate traffic and emergency egress tightens, so each extra structure can reduce real capacity. In tight commercial space, the right answer to capacity pressure is to build up with multi-level play structures, not out with more ground-level equipment. In small spaces and tight available space, that is the difference between an indoor play area that fits your space and one that overcrowds it.
Zoning by Age: Separating Toddler, Preschool, and Big-Kid Play

The single most common mistake that leads to toddler zones being under-frequented is making them accessible to high-traffic zones with older children. Implementing age-zoning removes this issue. Because participants naturally segregate into toddlers (about 1-2 years old), preschoolers (about 2-5), and school-age (about 5-14), each group seeks distinct equipment, appropriate fall heights, and a minimum of overlaps. There is also a standards boundary worth drawing into the plan: the soft-contained indoor play in most commercial playgrounds follows ASTM F1918, traditional public-use equipment for ages 2–12 follows ASTM F1487, and equipment for 6-to-23-month children falls under a separate standard (ASTM F2373). Because the governing spec changes with both equipment type and age band, your toddler, soft-play, and big-kid zones should be drawn, labeled, and signed as their own areas.
| Age band | Zone type | Typical equipment | Separation rule |
|---|---|---|---|
| Toddler (0–3) | Enclosed soft play | Foam shapes, low tunnel, mini slide, ball pit | Physical barrier; own entry; full sightline |
| Preschool (2–5) | Low active + imaginative | Role-play props, low climber, soft blocks | Visual buffer from school-age |
| School-age (5–14) | Main multi-level structure | Tube slides, climbing nets, ninja, trampoline | Energy-zoned away from toddlers |
Toddler zones: Use 15-25 percent of the floor plan (play area). Ensure they’re situated behind a low boundary, and are completely visible from a table in the cafe–toddlers will come to parents as long as they can see them, so a hidden toddler is an unplayed toddler. Keep this designated low-activity zone away from primary routes to other sections. Separating different age groups this way also keeps older kids from dominating climbing structures built for children of all ages.
Designing for Flow and Supervision: Circulation Loops and Sightlines
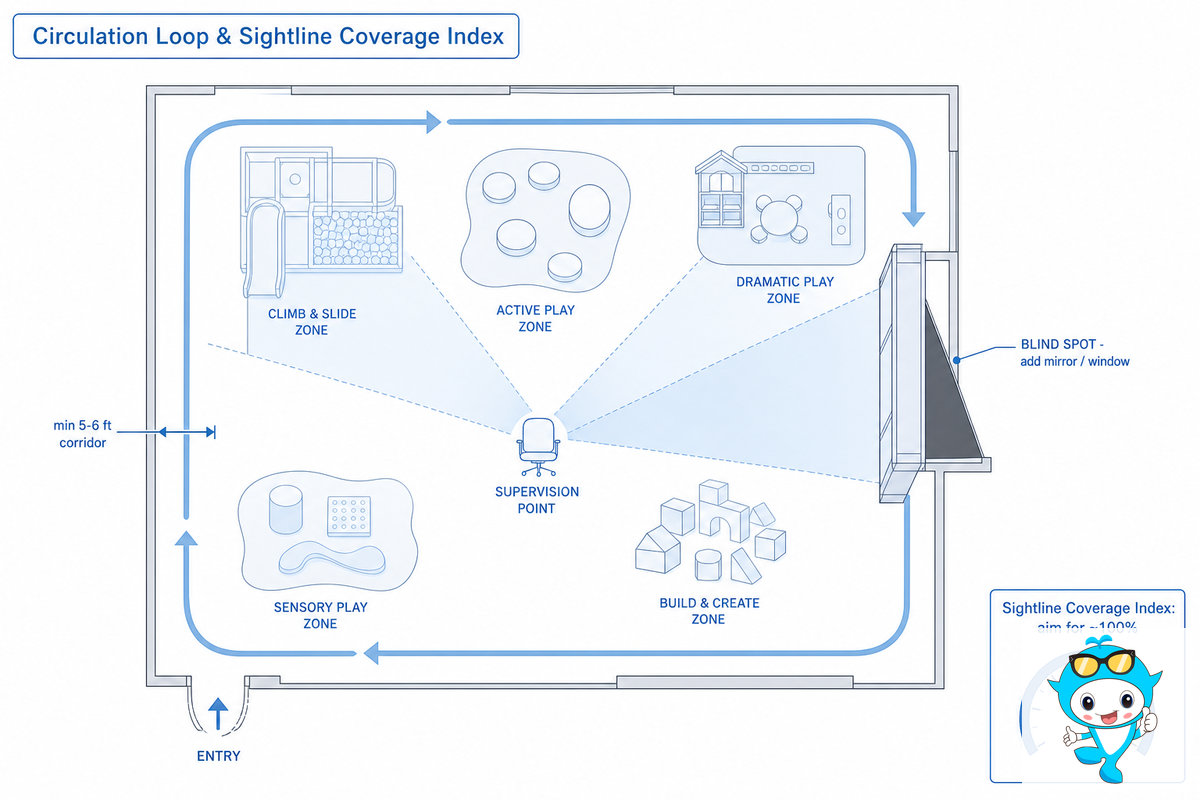
Two kinds of systems really do the work of the play area in a modern indoor play space:circulation, or the way people move through it, and lines of sight, how the spaces are viewed by staff and parents. Three patterns address just about everything we design for circulation: the circle, which leads back to the entry; the backbone, where other spaces hang off a central path; and the spokes, with a central hub. Whatever your choice, make your main hallways at least 5 or 6 feet wide in high-activity buildings. Anything narrower forces hand-policing for flow.
For supervision, plan to a Sightline Coverage Indexthe share of the play area directly visible from the main supervision point (the café seating or entry desk) — and push it as close to 100% as the structures allow. Treat any blind corner as a design defect, not a detail. The CPSC Public Playground Safety Handbook recognizes adult supervision as a core layer of safety, and your floor plan will either support it or quietly undermine it.
“On site reviews, the layouts that fail are rarely short of equipment, they are short of sightlines. When a parent has to stand up to find their child, the visit gets shorter and the spend gets smaller. We design the seated view first, then build the play around it.”
Didi Land Design & Engineering Team
Adding another floor doesn’t automatically create another safety layer, and enclosing structure adds a safety complexity that must be managed. As you gain vertical levels on any enclosed space, be prepared to increase adequate-supervision ratios or the density of viewing windows, or add mirrors for blind spots — no more and no less, not instead of either. No matter what the plan suggest, an enclosed space doesn’t yet translate to supervised space.
Compliance Built Into the Plan: Use-Zone Clearances and Accessible Routes

Safety considerations are a layout input, not a post-construction checklist. Save it on your schematic plan before selecting equipment, because accessibility and safety have a claim on square footage you’ll never get back. Two standards dictate most of it here.Make sure your standards edition is the latest.
📐 Engineering Note — clearances to draw in
- Traditional safety equipment, CPSC style use zones. Maintain at least a 6-foot radius use zone around all pieces of play equipment, 6 feet between adjacent equipment whose surface-and play surface elevation difference doesn’t exceed 30 inches, and 9 feet between pieces where that difference is greater.
- Soft-contained standards.ASTM F1918 governs contained tubes and deck-like play common in indoor parks, a complex code with requirements including exiting, aisle clearances, egress, and evacuation. Plan to the ASTM standard’s exit requirements, not the play standards.
- Accessible route widths, U.S. Access Board and ADA standards. Default is 60 inches of clear width, reducing to 36 inches of clear width only for a 60-inch length; transfer at 24 inches of width at minimum.
- Play Component Access – the number of accessible, in-play components (ground and elevated) affects ramp obligations – for twenty or more elevated components, 25 percent require a ramp for them; this results in a much larger ramp square footage and an entirely different multi-story approach.
- Surfacing -fall height dictates underlay and surrounding protective surfacing area; budget as floor space.
These clearances decide the plan, not the other way around. On one 6,000 sq ft destination FEC, the operator had specified a tall composite tower with several decks above 30 inches. When we laid in the 9-foot use zone that surfaces above that height require, plus the protective surfacing under each slide exit, the queue space the operator had penciled in simply vanished. Reserving the clearance first — before the tower was finalized — let us shrink the deck count by one and recover a clean entry queue, rather than discovering the conflict after the structure shipped.
Cite the live edition, and the right standard for your equipment type. Most commercial indoor playgrounds are soft-contained, so ASTM F1918which the CPSC handbook explicitly does not cover, is the controlling spec, with its own access, egress, and evacuation rules. Traditional public-use equipment follows ASTM F1487 in its current F1487-25 revision, approved in April 2025 and superseding F1487-21, with a new definition for “fully enclosed structure” and updated handrail heights for wheelchair-accessible ramps, directly relevant to multi-level indoor structures. Accessible routing comes from the U.S. Access Board’s play-area guidelines, where the count of elevated components, not just route width, sets your ramp and transfer obligations. For European-market projects, plan to EN 1176-1:2018+A1:2024, and treat a quiet, wheelchair- and stroller-friendly sensory retreat as a zone to reserve now rather than retrofit later.
Laying Out for Revenue: Party Rooms, Café Sightlines, and Retail Adjacency

A floor plan is also a revenue instrument. The order in which a visitor meet your zones is the Spend-Path Layout Sequence: entry → play → party → café → retail → exit. Each handoff is a chance to turn dwell time into spend, and placement decides whether it happens. Party rooms are a top profit driver, so give them their own entrance and a window onto the play floor, never route open-play customers through a private party. Put the café on the main sightline so seated parents linger and order, and place impulse retail or a redemption counter near the exit.
Space efficiency is the multiplier. Trade analysis from Recreation Management notes that about 70% of indoor attractions are installed in family entertainment centers, often layered over arcade or laser-tag areas precisely so they don’t consume revenue floor. Industry FEC benchmarks put revenue around $100 per square foot annually, with strong operators well above that, figures that are directional and depend heavily on attraction mix and food-and-beverage. The layout lesson is blunt: every square foot carries rent, HVAC, and insurance, so each one should either generate play value or sell something. This is exactly the thinking we bring to a revenue-driven FEC playground design.
💡 Pro Tip — a real layout regret
One play-café operator placed the venue’s only restroom inside the private party room. Open-play families cut through paid parties all day, crossing circulation and eroding premium pricing. Restrooms belong on a public circulation path that never passes through a revenue zone.
From Rough Sketch to Buildable Plan: The Layout Design Process
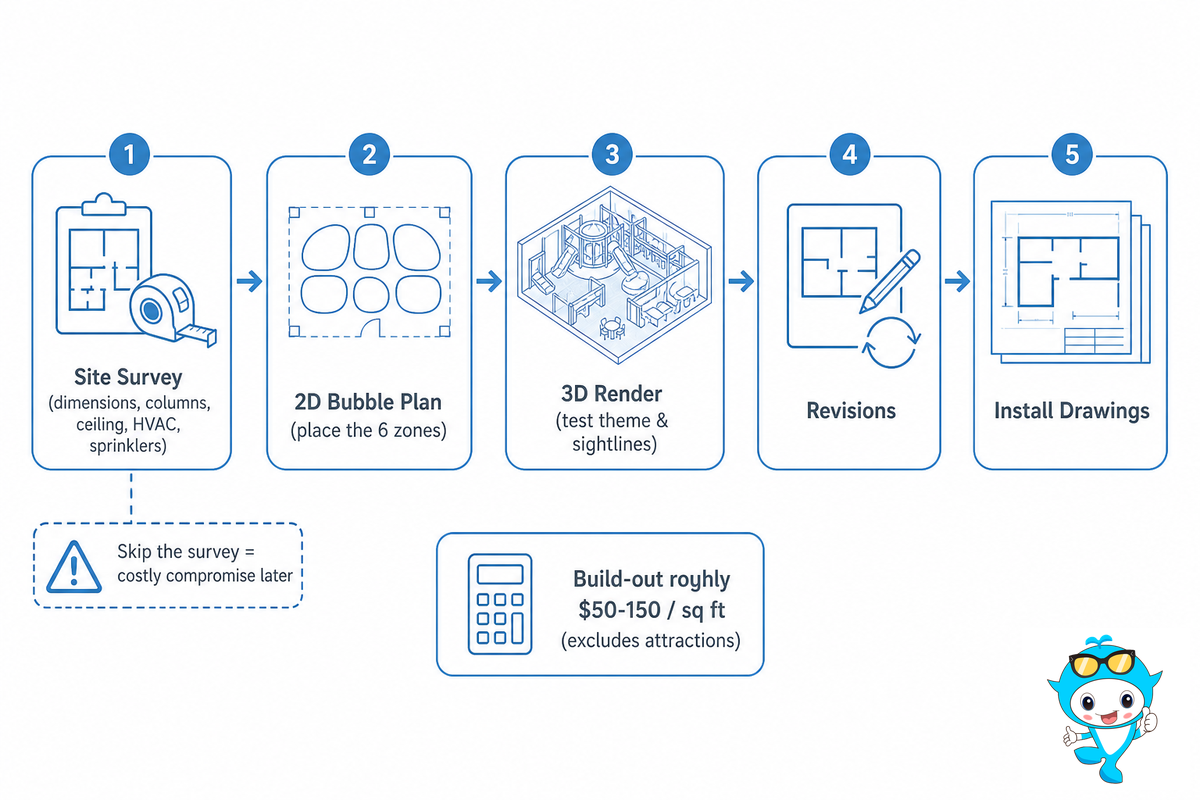
A buildable indoor playground design layout — a customizable, modular plan you can actually construct, not just a drawing — comes together in five phases of designing and building: a site survey (actual dimensions, columns, ceiling height, HVAC and sprinkler locations), a 2D bubble plan that places the six zones, a 3D render that tests theme and sightlines, revisions, and finally the install drawings your builder will work from. Most plans fall apart when builders ignore the survey- discovering a column, spot a low ceiling soffit after the equipment has been ordered means shoe-horning in a compromise that will echo for the life of the space. Done right, these five phases create a play space that balances fun and safety from the first day it opens.
How much does indoor playground design and layout cost?
Design is usually bundled into a manufacturer’s equipment quote, while independent studios bill it separately. The build-out is the larger number: industry budgeting guides put commercial fit-out at roughly $50–150 per square foot, a range that generally excludes the play attractions themselves, the gap that catches equipment-only investors. See our indoor playground equipment cost guide for the full breakdown. When you’re ready to turn a sketch into a plan, our team manage the survey, 2D, and 3D rendering process in-house.
7 Indoor Playground Layout Mistakes That Waste Square Footage and Revenue

Most layout failures are predictable. Audit any draft plan against these seven before it goes to build, each one quietly cost either usable square footage or revenue, and several trace back to the supervision and sightline gaps the CPSC Public Playground Safety Handbook warns about.
- ✔Dead-end layout. Dead ends interrupt play flow and waste floor; a loop keeps children circulating without adding area.
- ✔Single choke-point entry. One narrow door for entry, exit, and queue creates peak-time bottlenecks and an egress risk.
- ✔Blind-spot multi-level. Tall enclosed structures with no viewing windows hide children; raise supervision and add sightlines.
- ✔Undersized or buried toddler zone. A corner toddler area parents can’t see goes unused; give it 15–25% and a clear sightline.
- ✔No queue or stroller parking. Missing waiting and stroller space pushes congestion onto the play floor.
- ✔Ignored ceiling height. Planning multi-level play without confirming 12–16 ft clear height caps the structure after the lease is signed.
- ✔Under-budgeted surfacing area. Fall-zone protective surfacing is floor area; leaving it out of the plan forces last-minute compression of play.
Where Indoor Playground Layout Design Is Heading in 2026
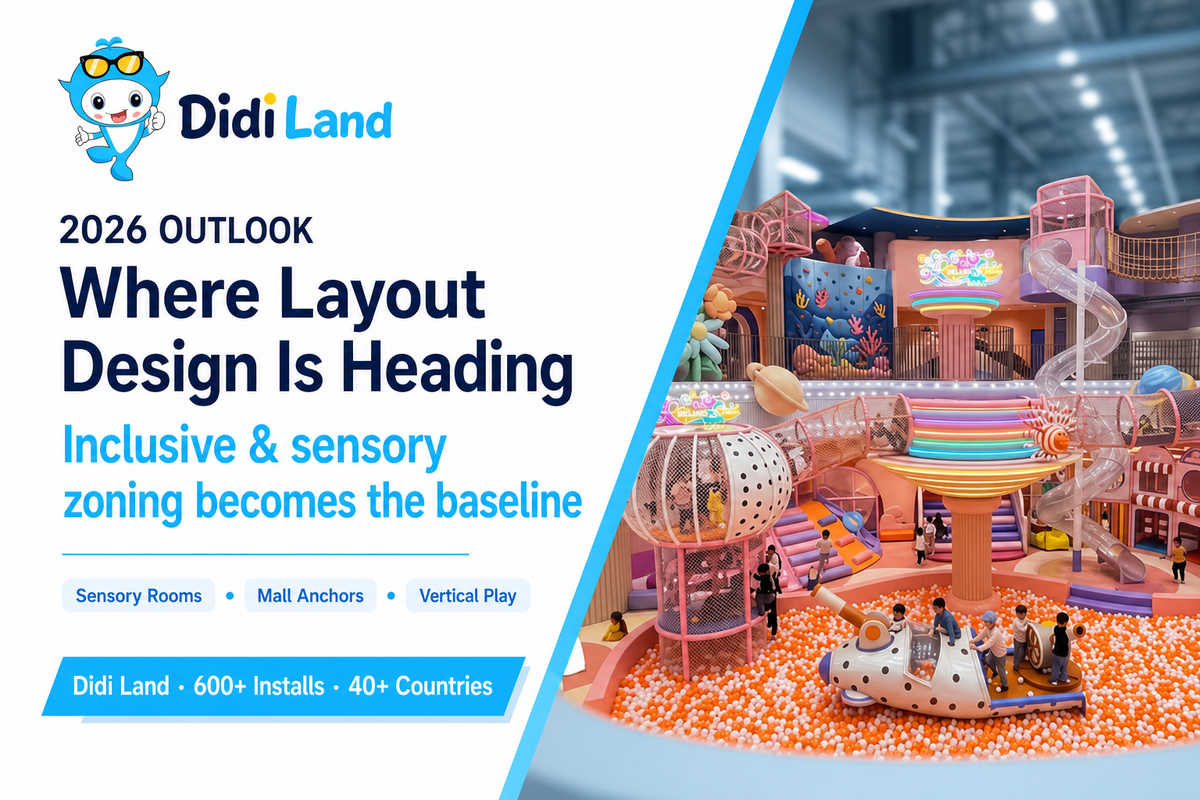
The clearest shift for anyone planning a build now is that inclusive and sensory-inclusive zoning has moved from a premium add-on to a baseline expectation. Designing a 2026 layout without a dedicated sensory retreat and genuinely accessible routing increasingly means designing in a retrofit cost, trade coverage from outlets like Recreation Management now frames sensory-friendly zones as a differentiator, not an option.
Two more drivers follow. First, experiential retail is pulling indoor playgrounds into malls as foot-traffic anchors, which rewards layouts that read clearly from a storefront and convert passers-by. Second, rising commercial rents reward vertical play, multi-level and wall-mounted structures that raise capacity per square foot in compact footprints.
In commercial practice: if you’re laying out a plan later this year, escrow the sensory zone and accessible route as first-class zones, design the mall’s storefront sightline for a family-entertainment market, and formulate the superstructure to expand vertically rather than laterally. (The family-entertainment market is huge and booming, but wait until later to derive market-size numbers, the above design decisions are what a single build in reality actually depends on.)
Frequently Asked Questions
How do you design an indoor playground floor plan?
View Answer
Start with zones, not equipment. Place the six functional zones — entry, toddler, active play, quiet/sensory, party, and supervision/café — so the supervision point sees the whole floor, then size each zone to your footprint (about 60–70% usable play). Reserve safety use-zone clearances and accessible routes on the plan, set primary corridors at a minimum of 5–6 ft, and only then select structures. A site survey of columns, ceiling height, HVAC, and sprinkler positions comes before any 3D render, because a column or low soffit found after equipment is ordered forces a compromise you live with for years. Finish by running the capacity check — usable area divided by square feet per child — and cross-checking it against your local occupant-load and exit count, which can cap density before the equipment does. In short: survey, zone, clear, size, then specify.
How much space do you need for an indoor playground?
View Answer
Plan about 25–35 sq ft per child for low-impact soft play and 40–50 sq ft per child for dynamic climbing and slides, applied to the usable 60–70% of your gross floor. A 3,000 sq ft unit at 65% usable and ~30 sq ft per child holds roughly 65 children at once. Always cross-check against your local occupant-load code, because the number and placement of exits can cap density before your equipment does.
What is the best layout for a small indoor playground?
View Answer
For a small footprint (under ~1,500 sq ft) and smaller spaces, use a single circulation loop and build upward rather than outward. Multi-level structures, wall-mounted play, and a compact toddler soft-play zone pack more play value into less floor while keeping one clear supervision sightline. Avoid cramming in extra ground-level equipment — once corridors drop below 5–6 ft, added structures reduce real capacity instead of increasing it.
How do you lay out a daycare or preschool indoor playground?
View Answer
Lead with age separation and sightlines. Split toddler (0–3) and preschool (2–5) into their own zones with a low barrier between them, keep equipment low and soft, and make the whole floor visible from a single staff position. Remember that ASTM F1487 covers ages 2–12 and excludes 6–24-month and soft-contained play, so label those zones separately.
How much does indoor playground design and layout cost?
View Answer
Design is often bundled into a manufacturer’s equipment package, while independent design firms bill it separately. The bigger cost is the build-out: industry budgeting guides put commercial fit-out at roughly $50–150 per square foot, and that range usually excludes the play attractions themselves. Treat any per-square-foot figure as a directional planning range and confirm exactly what it includes — fit-out only, equipment only, or both — before you budget.
How much clearance do you need around indoor playground equipment?
View Answer
Plan a minimum 6 ft use zone in all directions, and at least 9 ft between equipment when adjacent play surfaces are over 30 in high, per CPSC and ASTM F1487-25.
About This Analysis
The zone shares, capacity rule, and 12 floor plan templates in this guide are drawn from Didi Land’s in-house design and installation work across 600+ indoor playground projects in 40+ countries, cross-checked against CPSC, ASTM F1487-25, and U.S. Access Board guidance. Square-foot and revenue benchmarks are industry-directional and should be confirmed against your own site survey and local code. Reviewed by the Guangzhou Didi Land Amusement Equipment Co., Ltd. technical team.
References & Sources
- Public Playground Safety Handbook (Pub. 325)U.S. Consumer Product Safety Commission
- Chapter 10: Play Areas, ADA Accessibility GuidelinesU.S. Access Board
- ASTM F1487-25 Standard Consumer Safety Performance Specification for Playground Equipment for Public UseASTM International
- Adventure Awaits! (indoor attraction trends)Recreation Management
- Soft Contained Playgrounds: layout & site-plan considerationsPlayground Professionals
Related Articles
- Indoor Playground Design Ideas for 2026, themes & aesthetic inspiration to layer onto your layout
- Indoor Playground Equipment Cost: the full 2026 budget breakdown
- Soft Play Centre vs Indoor Playground: which model fits your space
- Indoor Playground ROI: is it worth the investment in 2026?
- Toddler indoor playground equipment for the 0–3 zone
![Custom Dinosaur Playground Equipment [Design Guide]](https://didiplayarea.com/wp-content/uploads/2026/09/custom-dinosaur-playground-equipment-r2-featured-1-768x512.png)
![Custom Dinosaur Playground Equipment [Design Guide]](https://didiplayarea.com/wp-content/uploads/2026/09/custom-dinosaur-playground-equipment-r2-featured-1-150x150.png)